 WYAE.de - IT Security, KnowHow & Software
Live Streaming HowTo
( english version below )
Manchmal möchte man selber sein Video-Streaming kontrollieren. Sei es, dass die bekannteren Anbieter wie Discord, Zoom, Cisco Webex oder Microsoft Teams die Teilnehmerzahl beschränken, die Soundqualität schlicht grottig ist: mindestens die ersten drei haben "Klangverbesserer" im Einsatz (manchmal sogar mit "KI" beworben), die Hintergrundgeräsche wie beispielsweise Musik herausrechnen. Ganz blöd bei Musikrunden und Circles.
Oder man möchte abseits übergriffiger AGBs streamen, da so manche Anbieter sich gleich die Rechte an Texten, Bildern, Lesungen o.ä. abgreifen wollen.
OpenSource Videokonferenz-Systeme wie Jitsi oder BBB/BigBlueButton brauchen heftigere Server und aufwändigere Konfiguration. Oder sie erlauben - wie z.B. NextCloud Talk in der Praxis nur sehr, sehr wenige Teilnehmer (2-10).
Dabei kann man vergleichsweise einfach eine ansehnliche Anzahl an Leuten erreichen.
Und hier ist wie.
Als Software auf Client-Seite braucht es OBS (und für ein entspannteres Zuspielen von Videos VLC).
Auf dem Server könnte quasi jeder beliebige Webserver verwendet werden (Apache, Lighttpd, NginX, ...) wenn man das Remuxen per ffmpeg selber machen will - oder man verwendet den NginX, der entsprechende Funktionen bereits eingebaut hat.
Der Webserver kann ganz trivial konfiguriert sein. Es wird nichts zusätzliches benötigt. Kein PHP, keine Plugins, keine Module, keine Sondersoftware. Einfach nur der Basis-Webserver. Man kann natürlich mehr installieren und für andere Projekte nutzen - wird aber für das Streaming nichts zusätzliches gebraucht.
Wie die Software installiert wird, ist systemabhängig. Wer das noch nicht selber schafft, für den ist diese Anleitung und wahrscheinlich auch das Betreiben (& Debuggen) eines eigenen Streaming-Servers ein Schritt zu viel.
Streaming-Client / -Source
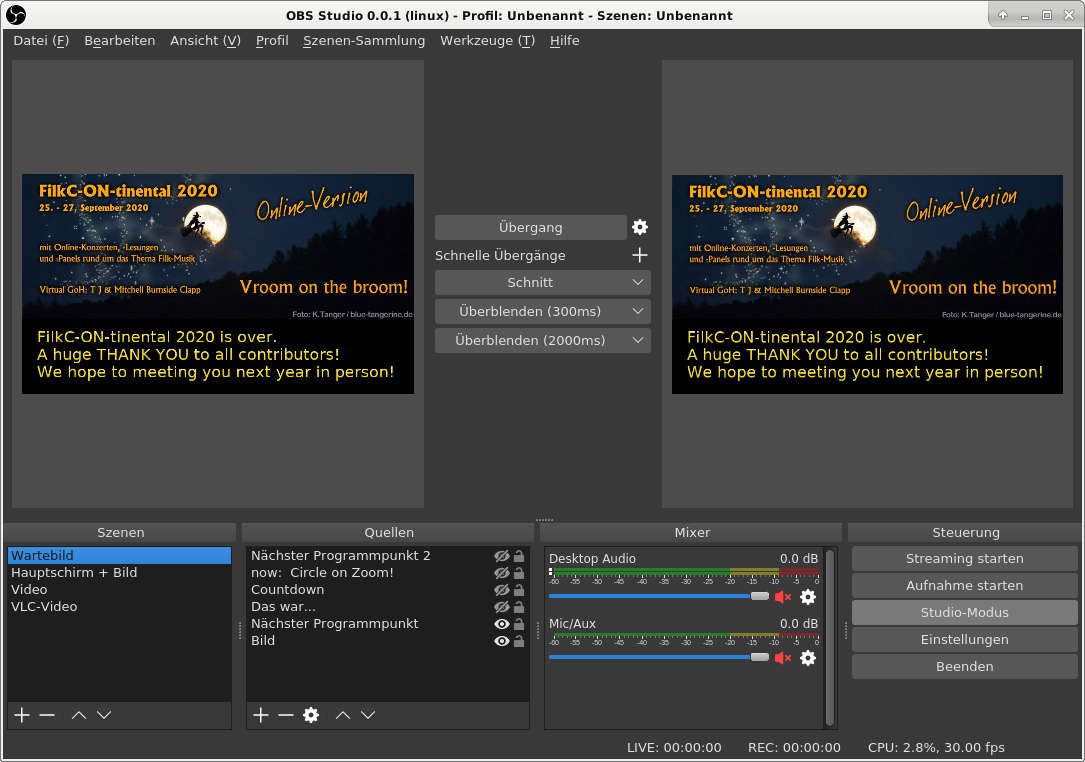
Als Streaming-Zentrale nutz(t)e ich OBS. Damit kann ich Videos abspielen, Bildschirme grabben und das Video von diesen weiterstreamen (beispielsweise Videokonferenzen mit Sprecher-Ansicht für Live-Konzerte). Und auch gleichzeitig streamen und aufnehmen.
Dazu definiere ich Szenen, die ich nacheinander überblende, beispielsweise Videos, Screen-Grabs oder Zwischenbilder.
Bei den Szenen kann ich mehrere Elemente miteinander kombinieren, beispielsweise das Hintergrundbild, Texte (die ich auch "live" ändern kann.
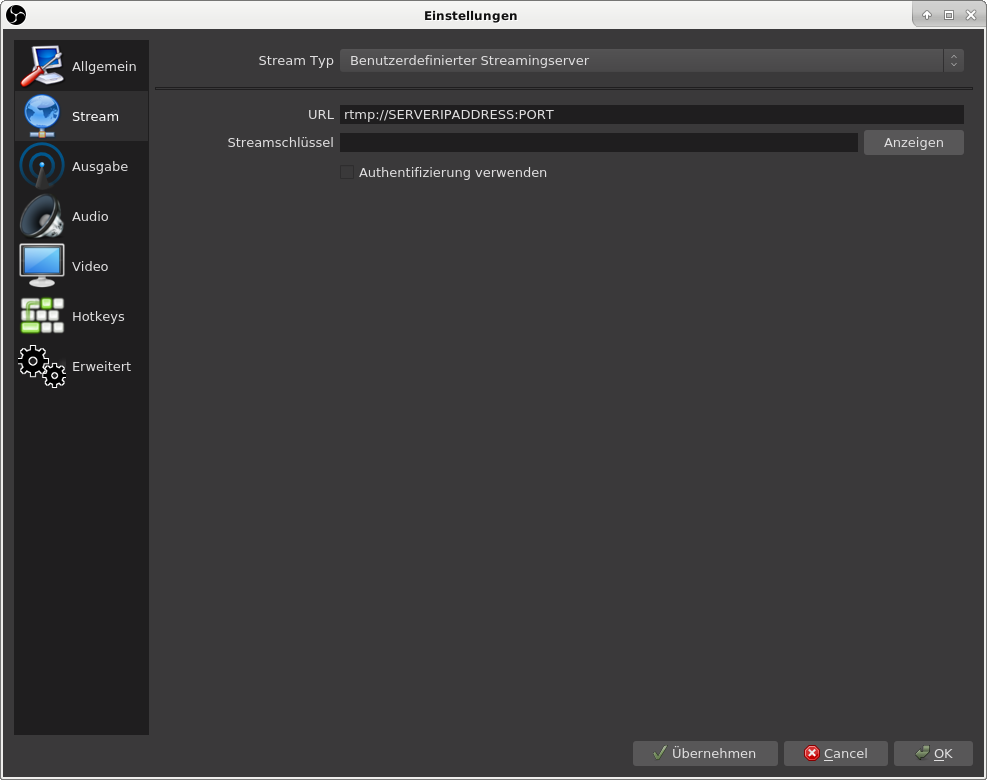
Als Transport in Richtung Upstream-/Verteil-Server verwende ich RTMP - vielleicht kann man da noch optimieren, aber das war das, was ich kurzfristig ans Fliegen bekommen habe. Einzustellen in den "Einstellungen" unter "Stream".
Natürlich kann man auch in Richtung YouTube, Twitch, Facebook und anderen streamen - hier existieren vorgefertige Profile - aber das wollten wir ja nicht.
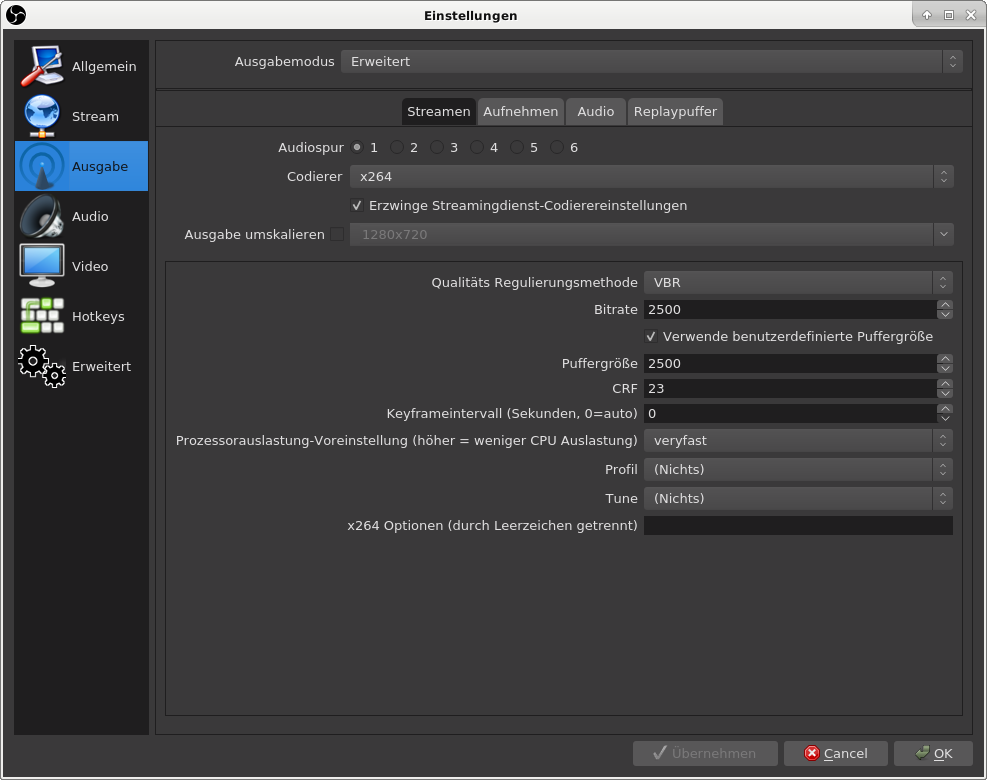
Die Video-Parameter für den Stream werden unter "Ausgabe" und dem Reiter "Streamen" eingestellt. Diese sollten zur Anwendung und zur Streaming-Seite passen. Im Bild meine Werte, die etwa einem "normalen" HD DVB-T Bild entsprechen.
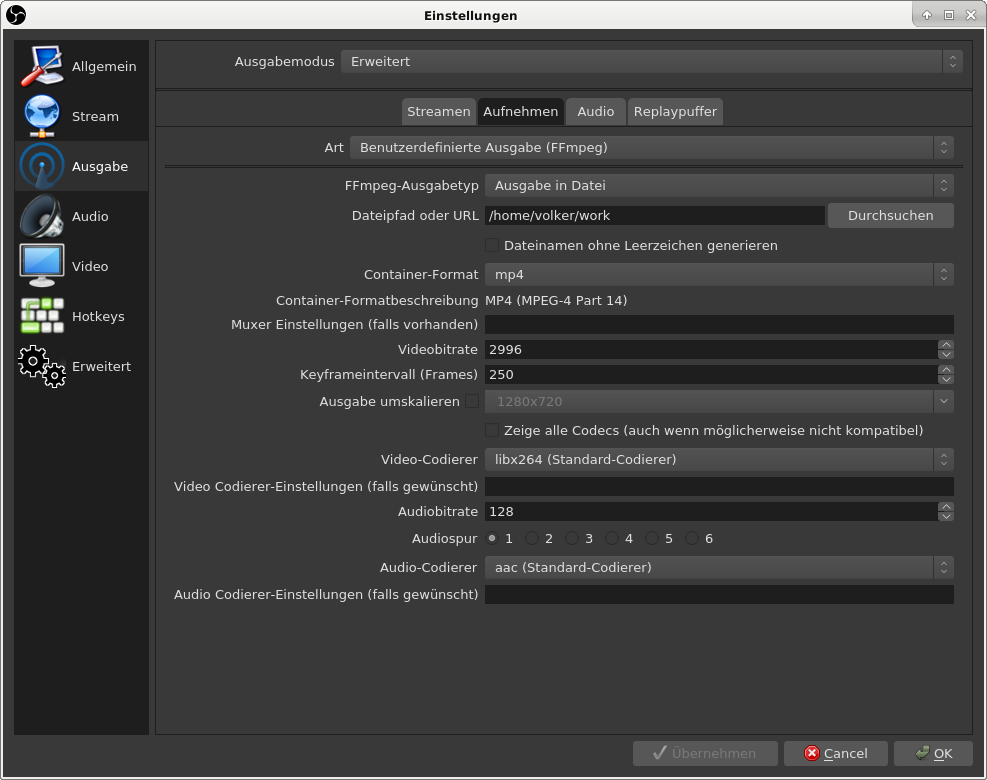
Wenn man den Stream dann auch gleich nochmal lokal aufzeichnen will, kann man sich den gewüschten Output entsprechend ebenfalls einstellen, dann unter dem Reiter "Aufnehmen".
Server - Theorie
Auf dem Server muss der RTMP-Stream umgebaut/umcodiert und anschließend an alle Interessenten verteilt werden.
Entsprechend braucht der Server genug CPU-Leistung. In meinem Beispiel reichten aber schon 2 virtuelle CPU-Kerne für rund 100 Zuschauer, ein dritter hätte mehr Luft gehabt und dann auch für das Gbit/s gereicht.
Entscheidend ist auch die Bandbreite: bei einem Videostream von 2 Mbit/s Bandbreite passen nicht mal 50 Zuschauer in einen "kleinen" bis "normalen" gehosteten vServer, für mehr bis ~400? Zuschauer ist dann schon 1 Gbit/s Serveranbindung notwendig. Das sollte man vorher auch mal austesten, was davon der Provider anbietet und was er tatsächlich liefern kann.
Ich verwende HLS-Streaming. Das bedeutet: viele 4-Sekunden-Schnipsel an .TS-Videos, und die aktuelle Position wird durch eine immer wieder aktualisierte .M3U8-Abspielliste definiert. Der Client lädt die .M3U8-Datei und spielt die enthaltenen .TS-Videoclips ab, aktualisiert die .M3U8-Datei alle paar Sekunden und hägt unbekannte Clips an. Das .M3U8 zeigt ein Zeitfenster auf die Dateiliste. Beispielsweise:
- nach 4s : clip1.ts
- nach 8s : clip1.ts clip2.ts
- nach 12s : clip1.ts clip2.ts clip3.ts
- nach 16s : clip2.ts clip3.ts clip4.ts
- nach 20s : clip3.ts clip4.ts clip5.ts
- nach 24s : clip4.ts clip5.ts clip6.ts
Der Client spielt entsprechend Clips 1,2,3,4,5,6 ab. Wer später einschaltet, bekommt eine spätere .M3U8-Datei dann entsprechend nach 21s nur Clips 3,4,5,6. Der Vorteil: Stotterer werden einfacher ausgeglichen, die Dateien sind einfache statische Dateien und als Server-Software reicht jeder Webserver (Apache, Lighttpd, NginX, ...) der statische Dateien ausliefern kann. Also praktisch jeder schon in der Basisausführung.
Server - Videostream remuxen
Am Einfachsten ist die Umcodierung mit dem NginX-Webserver/-Proxy.
Die unten gelistete Konfiguration übernimmt nur das Umcodieren und die Anmeldung.
Im OBS muss man dann unter "Stream" eintragen:
rtmp://SERVER_NAME/live?token=CHANGE_THIS_PASSWORD
Das "token" ersetzt den Streamschlüssel und ist sozusagen das Passwort.
Clients können dann unter https://SERVER_NAME/live/stream.m3u8 das Video verfolgen (s.o.)
Wer mehrere Streams anbieten möchte, kann einen Streamschlüssel eintragen, z.B. Buehne1, Buehne2, ... - die Clients können dann entsprechend die anderen Streams anschauen unter https://SERVER_NAME/live/Buehne1.m3u8, https://SERVER_NAME/live/Buehne2.m3u8 etc.
user www-data;
worker_processes auto;
pid /run/nginx.pid;
include /etc/nginx/modules-enabled/*.conf;

events {
        worker_connections 768;
        # multi_accept on;
}

rtmp {
    server {
        listen 1935;  # Standard RTMP port
        listen [::]:1935 ipv6only=on;
        ping 30s;

        notify_method get;  # forward notify request as GET (default POST)
        on_connect http://127.0.0.1:8765/rtmp_auth;

        application live {
            live on;
            deny play all;  # disable RTMP viewer clients (not streaming clients)

            # Use HLS transcoding
            hls on;
            hls_path /var/www/live;  # where fragments are stored
            hls_fragment 3s;  # length of each segment in seconds
            hls_playlist_length 30s;   # length of total recording in seconds
            hls_cleanup on;  # delete fragments on restart/shutdown
        }
    }
}
http {
  server {
    listen 127.0.0.1:8765 default_server;

    location = /rtmp_auth {
        if ($arg_token = "CHANGE_THIS_PASSWORD") {
            return 200;
        }
        return 403;
    }
  }
}
Zur Wiedergabe kann man einfach nur auf die .M3U8-Datei verweisen, oder auch zusätzlich einen Web-Player auf der Webseite anbieten.
Ich habe dazu die Basic Usage Demo des hls.js Players auf meinen Webserver kopiert und angepasst. Als JavaScript-Schnipsel habe ich die aktuellen hls.min.js und hls.min.js.map von deren github verwendet.
Stand Ende 2020 können iPads und iPhones sowie ältere Browser nichts mit dem Webclient anfangen. Die können dann das Video meist durch Anklicken/Download des M3U8-Links abspielen.
Praxis Tipps
Weitere "Kleinigkeiten" die man beachten sollte:
-
Durch Puffer erhalten Zuschauer den HLS-Stream erst mit ~20sec Verzögerung.
-
Wenn man nicht NginX nutzt, dann läft der Server irgendwann voll mit all den Schnipseln. Alte .TS-Dateien müssen irgendwann weg. Wenn man die .TS-Dateien nicht für Wiederholungen nutzen will (für die man dann passende M3U8-Dateien erzeugen muss), dann kann man die beispielsweise mit dem "find"-Befehl suchen und löschen (idealerweise dann als CRON-Job automatisiert). Oder wenn man einen neuen Stream startet. Aber dann bitte auf nachlaufende Nutzer achten und denen nicht gleich das noch laufende Video wegaxten.
-
Die Aufnahmedatei heißst immer gleich, wenn man den Stream-Namen nicht ändert. Ein zweiter Start des Streams oder der Aufnahme überschreibt den alten ohne Nachfrage. OHNE Nachfrage.
-
Es hat sich bewährt, eine Check-/Ablaufliste zu machen, wenn sich Stream-Schritte wie z.B. mehrere Vorträge wiederholen. Denn sonst vergisst man beispielsweise die Reihenfolge und löscht oder übersschreibt Dateien oder Streams.
-
Wenn man Screen-Grabbing nutzt, sollte man an dem entsprechenden PC 2 Bildschirme nutzen - und nach Start des Streamens die Finger vom PC nehmen. Sonst ploppen plötzlich Fenster auf dem falschen Bildschirm und damit mitten im Stream auf. Also: Flossen weg!
-
Wer das häufiger macht, sollte darüber nachdenken, statt einem PC vielleicht mehrere zu verwenden (jeweils mit 2 Bildschirmen: einer für das zu übertragende/grabbende Bild, der andere für die Steuerelemente):
- OBS Streaming-Kiste mit HDMI-Digitizer. Dann wird nur noch zwischen dieser HDMI-Videoquelle und Zwischenbildern umgeschaltet (oder gar nicht).
- Screengrabbing-PC "A", auf dem der aktuellen Live-Vortrag auf NextCloudTalk, Zoom, ... läft. Der Monitor des Übertragungs-Bildes hat einen Splitter (Y-Kabel?) zum Videomixer.
- Screengrabbing-PC "B" - bei dem der nächste Vortrag vorbereitet wird (dann Umschaltung zwischen den beiden Screengrabbing-PCs) Der Monitor des Übertragungs-Bildes hat einen Splitter (Y-Kabel?) zum Videomixer.
- Kontroll-PC, bei dem das (verzögerte!) Bild&Ton geprüft wird, ob auch alles tatsächlich so funktioniert wie geplant. Bei Problemen hat man zwar dann eine >20s langsame Reaktion - aber immerhin überhaupt eine.
- Chat-PC, auf dem die Konferenz-Reaktion mit den Teilnehmern kommunizieren kann.
- ggfs. weitere Videoquellen wie Kameras, Player, ...
Die Umschaltung mehrerer (HDMI-) Quellen auf OBS erfolgt mit einem "einfachen" HDMI-Videomischpult oder notfalls auch nur -umschalter (dann aber bitte mit Zwischenbildern).
-
Je mehr Technik, desto mehr Leute sollten dann auch eingesetzt werden! Einer pro PC. Sonst wird's in der Hektik hektisch und es passieren Fehler.
-
Vorproduzierte Videos sind viiiiel entspannter und berechenbarer als Live-Streaming. Keine zusammenbrechenden Leitungen, keine anderen technischen Probleme.
-
Vor einem Live-Streaming auf jeden Fall eine "Generalprobe" bzw. "SoundCheck" (und Video-Check) durchführen.
- Funktioniert der geplante Videochat überhaupt?
- Ist Bandbreite des Vortragenden hoch & stabil genug?
- Ist der Sound ok und laut genug? Grätschen vielleicht "Klangverbesserer" dazwischen und versauen den Klang? Das können sowohl manche Audio-Treiber als auch Videochat-Clients (WebEx, Zoom, Discord).
- Sitzt der Vortragende zentral und halbwegs formatfüllend im Bild, ist gut ausgeleuchtet und scharf? Ggfs. Lichter oder Standort ändern, oder vielleicht auch abpudern.
-
Plan B und C haben, falls Teile wegbrechen. Umbaubares Programm, zwischenspielbare voraufgezeichnete Videos, alternative Internetanbindungen, alternative Videokonferenz-Anbieter und -Clients.
-
Ein schneller Kommunikationskanal ist unverzichtbar, wie z.B. eine Chat-Plattform, auf der die Teilnehmer sich auch während der Vorträge unterhalten können - und man als Veranstalter spontane Programmänderungen ankündigen kann.
-
Das Problem sitzt oft zwischen Kamera und Sessel. Daher genug Zeit und viel Geduld mitbringen. Und eine Generalprobe machen. Und Plan B+C in der Hinterhand haben.
-
Entfernte Vortragende sollten ALLE anderen Programme ausschalten. Insbesondere alles, was auch Video oder Audio machen wollen könnte.
-
Der Streaming-Server sollte im zeitnahen Monitoring stehen: benutzte und verfügbare Bandbreite, CPU-Last, freier Festplattenplatz.
-
nVidia Hardware-Encoding stottert im Stream gerne mal (Stand 2021). Für Recording ist das aber problemlos.
ENGLISH
Sometimes you just want to be in control of your very own video streaming service. Whether that the usual video conferencing companies limit the number of participants (like Discord, Zoom, Cisco Webex or Microsoft Teams), or an abysmal sound quality. Especially for music - the first three have "sound enhancement" that tries to filter out any music - which is Not Good(TM) if you want to stream music.
Or maybe you want to stream content without intrusive terms, as some services claim all rights to everything you transfer: texts, images, readings, music...
OpenSource video conferencing systems like Jitsi or BBB/BigBlueButton need heftier servers and much more work with respect to configuration and administration. Or they offer (like NextCloud Talk) only a very, very limited number of participants (2-10).
But if you know how, then you can reach a respectable number of viewers without having to go overboard with prerequisites..
And here is how:
On client-side you need the OBS software. For an easier playback/injection of videos I recommend installing the VLC video player alongside.
On server side you could use basically any web server (Apache, Lighttps, NginX, ...), plus the FFmpeg software and some ellbow grease - or use the NginX web server that already has HLS muxing builtin.
A basic installation of the web server is sufficient. It only needs to serve static files - which basically any server can do in its basic configuration. You do not need any plugins, no modules, no PHP, no special software. Just the basic webserver. Of course you still can add modules, e.g. if you want to use the PHP (or whatever) for additional projects. But that is not needed for this streaming setup.
On how to install the software - won't be covered here. Running a streaming setup is not for the faint-hearted or people who do not know on how to install, administer and securely run an internet server.
Streaming-Client / -Source
For streaming console I use(d) OBS. With OBS you can stream videos, screen-grabs (e.g. video conferencing with speaker-view - what we used for live converts). And you can simultaneously stream and record.
For this I define "scenes" that will be cut/faded one after the other, e.g. videos, screen-grabs or "next up:" images. In the scenes I can combine various elements, e.g. background image, multiple videos (e.g. speaker and slides), texts (that can be changed live).
For streaming the video to the upstream-/distribution-server I use RTMP. Maybe that leaves room for improvement - but RTMP stream was the one I have been able to get proper results on short notice. You can set the upstream server in the "preferences" under "stream".
Of course you could use one of the predefined services like YouTube, Twitch, Facebook or one of the others (here you have predefined profiles) - but that is exactly what we did not want here.
The video encoding parameters for the stream are set unter "output" and the "stream" tab. These should be chosen according to your needs. Below the values I used which represent a "normal" HD DVB-T quality.
If you want to (simultaneously) record the event locally, you can set the according parameters in the tab "recording".
Server - Theory
On the server the RTMP stream is converted/remuxed and distributed to all viewers.
So the server needs an minimum CPU power to do this. In my case 2 virtual CPU cores were enough for ~100 viewers. A 3rd one would have been nicer for a more comfortable buffer - and probably would have been enough to saturate 1Gbit/s (and ~400 viewers).
The other contraint is bandwidth: if your videostream is running at 2 Mbit/s per viewer (normal/better DVB-T) then less than 50 viewers will saturate a "small" to "normal" vServer. For more (and up to ~400? viewers) you need a vServer with 1 Gbit/s = 1000 Mbit/s network connection. And of course you should test the capacity the provider actually can deliver before you need to depend on it.
Here we use HLS streaming. That basically cuts the video into manymany 4-second-videoclips in .TS-format. The current video clips are listed in a .M3U8 file which also is renewed every few seconds. The video player loads the .M3U8 file and plays the videos listed in it - and repeats reloading the .M3U8 file, appending the videos to its playlist. So the .M3U8 gives a window of "current" .TS clips like this:
- after 4s : clip1.ts
- after 8s : clip1.ts clip2.ts
- after 12s : clip1.ts clip2.ts clip3.ts
- after 16s : clip2.ts clip3.ts clip4.ts
- after 20s : clip3.ts clip4.ts clip5.ts
- after 24s : clip4.ts clip5.ts clip6.ts
The client will play clips 1,2,3,4,5,6 ab. Those viewers joining later only will see a later .M3U8 file and start later. If you join at 21s you will only see clips 3,4,5,6 (in this example). The big advantage of this technique: network jitter and delays are easier to buffer out, the "stream" is just a bunch of static files that can be downloaded over any infrastructure (regardless whether there are content inspection proxies in between) and which can be served with high performance (and low load) by basically any web server even in its most basic configuration.
Server - remux videostream
The easiest way to convert the stream is by using the NginX webserver/proxy.
The configuration listed below only does recoding and authentication.
In OBS you will have to configure the "Stream" as:
rtmp://SERVER_NAME/live?token=CHANGE_THIS_PASSWORD
where "token" replaces the usual stream key and is basically the password for the uplink.
Clients can view the thusly generated stream under https://SERVER_NAME/live/stream.m3u8
A very pracitical side-effect: if you enter a streaming key (e.g. stage1, stage2, ...), then clients can watch the different streams under https://SERVER_NAME/live/stage1.m3u8, https://SERVER_NAME/live/stage2.m3u8 etc.
user www-data;
worker_processes auto;
pid /run/nginx.pid;
include /etc/nginx/modules-enabled/*.conf;

events {
        worker_connections 768;
        # multi_accept on;
}

rtmp {
    server {
        listen 1935;  # Standard RTMP port
        listen [::]:1935 ipv6only=on;
        ping 30s;

        notify_method get;  # forward notify request as GET (default POST)
        on_connect http://127.0.0.1:8765/rtmp_auth;

        application live {
            live on;
            deny play all;  # disable RTMP viewer clients (not streaming clients)

            # Use HLS transcoding
            hls on;
            hls_path /var/www/live;  # where fragments are stored
            hls_fragment 3s;  # length of each segment in seconds
            hls_playlist_length 30s;   # length of total recording in seconds
            hls_cleanup on;  # delete fragments on restart/shutdown
        }
    }
}
http {
  server {
    listen 127.0.0.1:8765 default_server;

    location = /rtmp_auth {
        if ($arg_token = "CHANGE_THIS_PASSWORD") {
            return 200;
        }
        return 403;
    }
  }
}
The viewers simply can open the .M3U8 file in the browser, which usually will launch an appropriate media player. Additionally you can add a web player on your web site for convenience. I used the Basic Usage Demo of the hls.js player, which I copied to my web site and adapted accordingly. Differing from the demo page I used the current hls.min.js and hls.min.js.map files from the project's github. As of Autumn 2020 iPads and iPhones and older browsers cannot use the web player mentioned above. So make sure to include a link to the .M3U8 file they can view.
Practical Tipps
Some more "little things" you should have an eye on:
- Due to latencies in protocol and buffer viewers see events ~20sec after you see them in OBS.
- As .TS video snippets are not deleted autimatically the server will fill up with them over time. So unless you want to re-use the stream files for CPU-friendly (as re-encoding-free) re-streaming (where you still need a way to create proper .M3U8-files) you should clean up old .TS files. For this you can e.g. user the "find" command and delete .TS files older than 15 minutes. Ideally via a CRON job automating the task. Or clean up whenever you start a new stream. But please consider viewers maybe still viewing the old stream - if you restart end-to-end then you will probably kill the end of the previous video before its time for some biewers.
- The files always will have the same name. Recording and stream files. Those will be overwritten whenever you re-start recording or streaming. WITHOUT any confirmation or hesitation.
- It is highly recommended to have a detailes check-list with each single step you need to perform when switching from one programming item to the next. Or els you might mix up tasks or forget to rename a recording before you overwite it.
- If you use screen-grabbing (e.g. a video-call) you should use at least 2 screens (one for OBS, one full-screen to be grabbed) - and keep hands off the PC as soon as streaming started. Otherwise you will risk windows popping up on the wrong screen (and into the stream). So: hands off!
- If you intend to do this more often, it might be a good idea to have
a number of PCs (with 2 screens each, one for control surfaces, the
other for full-screen content):
-
* OBS streaming box with a HDMI digitizer. Then you only have
to switch between this and "next up" images (or not at all).
* screen-grabbing PC "A", where you stream the current talk via
NextCloudTalk, Zoom, ...
The monitor with the full screen image that should be
streamed is split with a Y-cable between monitor and a
video mixer.
* screen-grabbing PC "B" - basically the same as "A", but here
you prepare the next talk, so you can alternate between
"A" and "B" with enough time to prepare.
* Playback-PC, where you view (and listen to) the (delayed)
video so you can control whether streaming actually works.
If you detect problems here, any reaction will be 20sec late,
but better late than never.
* Chat-PC, where you attend the conference and can communicate with
participants and presenters/artists.
* optionally more video sources like cameras etc.
- The more tech you use, the more people you need. At least one per PC. Otherwise it will become hectical when stuff gets hectic - and mistakes will be more often and more prominent.
- If possible use pre-produced videos - muuuch more relaxed and reliable. No breakdowns in internet connection, no strange other phenomena. My last event had 22 contributors - and EVERY SINGLE ONE had DIFFERENT problems.
- Please do make a dress rehearsal / sound check with the presenters /
artists on the day(s) before a live stream.
-
* Does the video chat work with their setup?
* Is their internet connection up to the task (speed, reliability)?
* Is the sound ok and loud enough? Maybe some "sound improvement"
is creating problems (can be hidden in both, audio device
driver or "sound improvement"/"noise cancellation" of the
video chat app (esp. WebEx, Zoom, Discord).
* Is the video ok? The presenter / artist(s face) should be in
or slightly above the middle of the screen, the image sharp
and well lit. Maybe change position, add lights, maybe even
ou on some makeup to cover a shiny baldness.
- Have a plan B and C, especially if things break. Be flexible with programming, sprinkle pre-recorded videos throughout the program so you can shift things if more persistent problems occurr. Have multiple video conference alternatives to be able to switch to. Maybe even have multiple internet uplinks.
- You do need a fast and easy communications channel to your presenters / artists. A central chat platform (like Discord, Slack, Matrix/Riot, ...) where you can communicate with viewers, participants and artists - especially if you have to change programming on shot notice.
- The problem often sits between camera and chair. So please be patient, plan enough time for setup/preparation. Make a dress rehearsal / sound check. And have plan B and C.
- Ask the participants to switch off all programs that are not needed for the streaming. Basically everything except the video conference and the chat. Especially stop everything that might want to do audio or video.
- Do keep a close eye to the ressources on the streaming server: bandwidth, CPU usage, free disk space.
- nVidia hardware-encoding sometimes creates a stuttering stream (as of 2021). Für Recording does not have this problem.